unity3d 巡逻兵小游戏
应用事件订阅与发布模式.
Patrol
关于这个游戏的制作已经有很多大神给了详细的实现和分析, 比如这个, 我在这里就不现丑了, 主要分享我如何 从零开始 做好这个游戏.
准备工作
- 将之前写好的比如 userGUI, Director, FirstController, Singleton, Factory, CCActionManager, SSActionManager, SSAction 这些文件复制到我们新项目的 Scripts 文件夹, 之前写的这些代码很多都可以重复使用, 就不必重新写了.
- 找到合适的模型资源、贴图等(也可以用简单的cube实现).
实现部分
总体来说, 整个过程是可视化+传统Debug来完成的, 所以首先会忽略很多的细节问题, 然后一步一步加以完善.
GUI
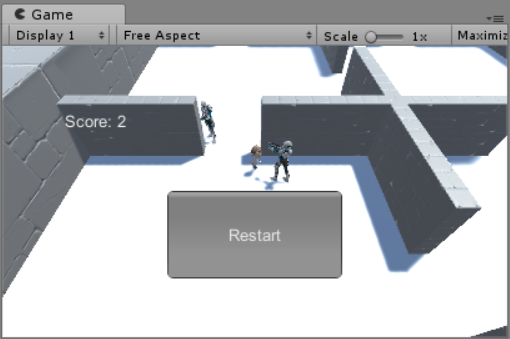
就是一些按钮和分数显示, 是之前做过的, 点击 restart 后会重新开始, 这里先忽略细节.
加载资源
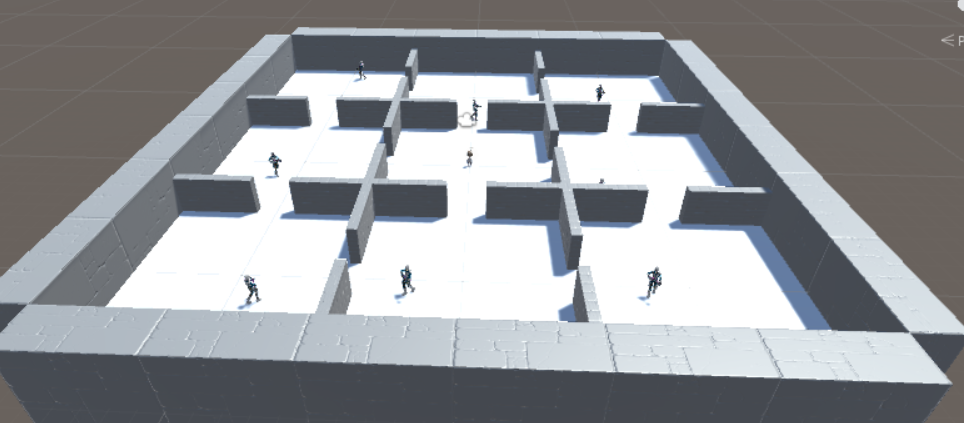
将墙壁、平面、玩家、士兵加载到地图, 观察效果1
2
3
4
5
6
7
8
9
10
11
12
13
14
15
16
17
18
19
20
21
22
23
24
25
26
27
28
29
30
31
32
33
34
35
36
37
38
39
40
41
42
43
44
45
46
47
48
49
50
51
52
53
54
55
56
57
58
59
60
61
62
63
64
65
66
67
68
69
70
71
72
73
74
75
76
77
78
79
80
81
82
83
84
85
86
87
88
89// @FirstController.cs
// 加载资源
public void LoadResources()
{
LoadPlane();
LoadOutWall();
LoadWall();
}
void Start () {
// 因为要用到一些组件, 所以在Start加载
LoadPatrol();
// 这两个可以先无视
Factory = Singleton<PatrolFactory>.Instance;
ActionManager = Singleton<CCActionManager>.Instance;
}
private void LoadPatrol()
{
int num = 1;
for (int i = 0; i < 3; i++)
{
for (int j = 0; j < 3; j++)
{
if (i != 1 || j != 1)
{
// 主要
var p = Factory.GetPatrol();
p.SetActive(true);
p.GetComponent<Patrol>().Catch = false;
p.GetComponent<Patrol>().Hit = false;
p.GetComponent<Patrol>().Lock = false;
// 主要
p.transform.position = new Vector3(-10 + 10 * i, 0, -10 + 10 * j);
Patrols.Enqueue(p);
p.GetComponent<Patrol>().Num = num;
GameEventManager.LockChange += p.GetComponent<Patrol>().LockPlayer;
GameEventManager.UnlockChange += p.GetComponent<Patrol>().LosePlayer;
ActionManager.PatrolGo(p);
}
num++;
}
}
}
private void LoadWall()
{
for (int i = 0; i < 2; i++)
{
for (int j = 0; j < 3; j++)
{
GameObject.Instantiate<GameObject>(Resources.Load<GameObject>("WallY"), new Vector3(-5 + 10 * i, 1, -13 + 10 * j), Quaternion.identity);
GameObject.Instantiate<GameObject>(Resources.Load<GameObject>("WallY"), new Vector3(-5 + 10 * i, 1, -7 + 10 * j), Quaternion.identity);
GameObject.Instantiate<GameObject>(Resources.Load<GameObject>("WallX"), new Vector3(-13 + 10 * j, 1, -5 + 10 * i), Quaternion.identity);
GameObject.Instantiate<GameObject>(Resources.Load<GameObject>("WallX"), new Vector3(-7 + 10 * j, 1, -5 + 10 * i), Quaternion.identity);
}
}
}
private void LoadOutWall()
{
for (int i = -16; i < 18; i=i+32)
{
for (int j = 0; j < 6; j++)
{
GameObject.Instantiate<GameObject>(Resources.Load<GameObject>("OutWallY"), new Vector3(i, 1, -12.5f + j * 5), Quaternion.identity);
GameObject.Instantiate<GameObject>(Resources.Load<GameObject>("OutWallX"), new Vector3(-12.5f + j * 5, 1, i), Quaternion.identity);
}
}
}
private void LoadPlane()
{
GameObject t = null;
int Num = 1;
for (int i = -10; i < 11; i=i+10)
{
for (int j = -10; j < 11; j=j+10)
{
t = GameObject.Instantiate<GameObject>(Resources.Load<GameObject>("Plane"), new Vector3(i, 0, j), Quaternion.identity);
t.GetComponent<AreaController>().Sign = Num;
Num++;
}
}
}
这一步通常需要你调整资源到合适的位置, 因为已经可以运行看到效果了, 所以预计你的调整会很快完成. 我这里没有写 加载玩家 的代码, 请自己实现.
玩家移动
利用Unity的Input, 实现可控玩家的移动操作部分. 在这里我实现了行走、跳跃.
完成后请运行测试.
1 | @PlayerMove.cs |
士兵移动
在这里需要暂停一下, 要考虑清楚你想让士兵怎么移动, 矩形? 五边形? 六边形?……
如果是有规律的, 一般可以新建一个 动作类 继承 SSAction, 然后用CCActionManager来管理.
在这里, 我把巡逻的矩形区域分成了 上下左右 四个部分(随机取点), 以逆时针的方向巡逻.1
2
3
4
5
6
7
8
9
10
11
12
13
14
15
16
17
18
19
20
21
22
23
24
25
26
27
28
29
30
31
32
33
34
35
36
37
38
39
40
41
42
43
44
45
46
47
48
49
50
51
52
53
54
55
56
57
58
59
60
61
62
63
64
65
66
67
68
69
70
71
72
73
74
75
76
77
78
79
80
81
82
83
84
85
86
87
88
89
90
91
92
93
94
95
96
97
98@CCActionManager.cs
public class PatrolAction : SSAction
{
public Vector3 OriPos; // 初始位置
public Vector3 target; // 目标位置
public int WalkWay;
// 0 为上, 1 为左, 2 为下, 3 为右 (小区域)
public float speed; // 速度
// 巡逻相关
public Patrol PatrolData;
// 创建一个 PatrolAction 并返回, 便于 CCActionManager 管理
public static PatrolAction GetPatrolAction(int way, Vector3 o)
{
PatrolAction action = ScriptableObject.CreateInstance<PatrolAction>();
action.OriPos = o;
action.WalkWay = way;
action.SetTarget(way);
return action;
}
public override void Start()
{
PatrolData = gameobject.GetComponent<Patrol>();
}
// 巡逻移动看 主要 部分
public override void Update()
{
if (PatrolData.Catch == true)
{
PatrolData.Attack();
this.destroy = true;
return;
}
if (PatrolData.Hit == false)
{
PatrolData.Walk();
speed = 2f;
if (PatrolData.Lock == true)
{
this.target = ((FirstController)(Director.GetInstance().CurrentScenceController)).Player.transform.position;
this.target.y = 0;
PatrolData.Run();
speed = 4f;
}
// 主要
this.gameobject.transform.LookAt(this.target);
this.gameobject.transform.position = Vector3.MoveTowards(this.gameobject.transform.position, this.target, speed * Time.deltaTime);
if (this.gameobject.transform.position == this.target)
{
this.destroy = true;
// 当走到一个巡逻位置, 调用 CCActionManager 来进行下一次的巡逻
this.callback.SSActionEvent(this);
}
// end of 主要
}
else
{
this.destroy = true;
this.callback.SSActionEvent(this);
}
}
// 设置目标位置 根据方向
public void SetTarget(int way)
{
float z = 0;
float x = 0;
if (way == 0)
{
z = Random.Range(0, 4.5f);
x = Random.Range(-z, z);
}
else if (way == 1)
{
x = Random.Range(0, 4.5f) * -1;
z = Random.Range(x, -x);
}
else if (way == 2)
{
z = Random.Range(0, 4.5f) * -1;
x = Random.Range(z, -z);
}
else
{
x = Random.Range(0, 4.5f);
z = Random.Range(-x, x);
}
this.target = new Vector3(x, 0, z) + this.OriPos;
}
}
1 | // @ Class CCActionManager |
士兵抓捕玩家
巡逻兵在设定范围内感知到玩家,会自动追击玩家;
一种方法是巡逻兵记录它的设定范围, 然后每帧判断玩家是否进入, 然后再修改 PatrolAction, 不过这样类与类之间的关系就会变得十分复杂了, 不便于维护(实际上如果出了什么bug, 修复起来也是十分难受的).
我的方法是将逻辑分层成 玩家->区域->士兵, 玩家在各个区域移动(有一个记录玩家区域的标识), 士兵在设定区域巡逻(它们拥有相同的标识). 当玩家走进一个新区域时, 会触发一个事件, 让巡逻兵检查玩家是否闯进了自己巡逻的区域(根据标识), 以此修改自己状态(巡逻|抓捕).
这样分工后逻辑清晰, 每个类也不至于很臃肿. 那么下面就一步一步实现这个过程.
区域检测玩家
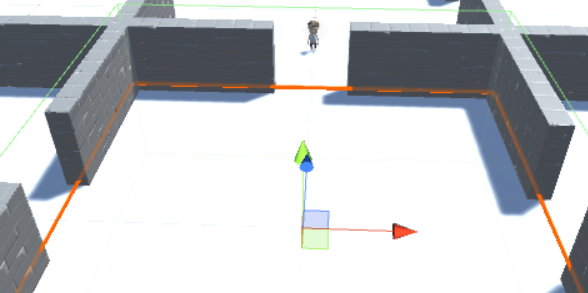
绿色线包围着的就是一个作为触发器的碰撞体, 当玩家进入时可以触发OnTriggerEnter, 在里面可以根据name或者tag判断是否为玩家.
1 | @AreaController.cs |
订阅与发布模式
上面的代码可以看到触发了事件, 再根据更之前的讨论, 是巡逻兵订阅了这个事件, 事件触发, 巡逻兵执行对应函数检查玩家是否在自己的区域中.
1 | @GameEventManager.cs |
1 | @FirstController.cs |
1 | @Patrol.cs |
抓捕行动(Action)
上面已经实现到状态的切换了(巡逻|抓捕), 然后就是动作的切换. 在 PatrolAction 中判断状态来进行相应的动作就OK.
1 | @CCActionManager.cs |
到这里, 这一部分也告一段落了, 接下来就只是一些细节的问题了.
游戏结束
当巡逻兵与玩家发生碰撞时, 游戏结束. 这可以类似玩家进入区域的判定方法, 不过这里用的是碰撞事件OnCollisionEnter
1 | @Patrol.cs |